Reducing Transplant Trauma

Transitioning slowly from seedling tray to garden bed.

Seedling Tray To Garden Bed

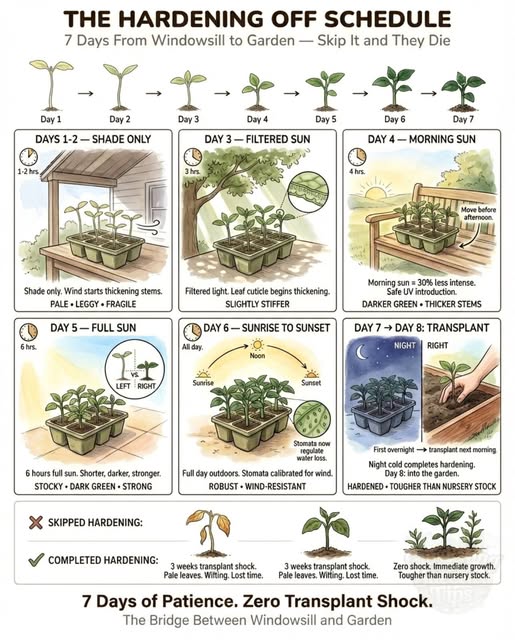
Those seedlings you grew under lights look perfect on the windowsill. Put them straight into the garden and they’ll stall — pale leaves, wilting stems, weeks of recovery before they grow again.

The bridge between indoors and outdoors takes about a week. Here’s the short version.

The schedule:
– Days one and two — set the tray outside in full shade for an hour or two, then bring them back in. The wind alone starts thickening the stems. Indoor seedlings have never felt moving air, and the stems respond by building structural cells they didn’t need before

– Day three — move to dappled light under a tree canopy for a few hours. The leaves start developing a protective waxy layer they couldn’t build under grow lights, which put out almost no UV

– Day four — gentle morning sun only, a few hours. Move to shade before afternoon intensity. Morning light is significantly softer than afternoon light and gives the leaves time to adjust

– Day five — full sun for most of the day. By now the seedlings look visibly different from where they started — shorter, stockier, darker green, thicker stems

– Day six — leave the tray outside from sunrise to sunset. Bring inside at night

– Day seven — first overnight outdoors. The cool night temperature triggers a final toughening response in the cell walls

Day eight — transplant into the garden. Water deeply. Mulch around the stem.

The seedlings that went through this week hit the ground growing. The ones that skip it spend three weeks catching up. A week of patience on the porch saves a month in the bed.

That’s the whole schedule. Shade to sun. Gradual. One week

Succession Planting

Succession Planting

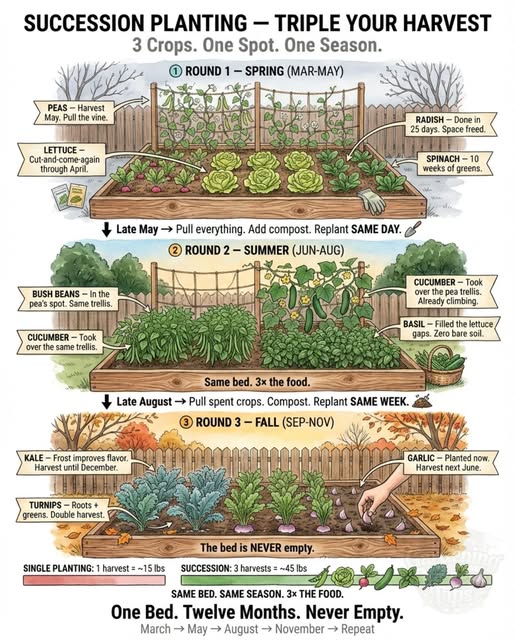
Your raised bed sits empty from October to April. That’s half the year producing nothing from the same soil, same space, same sun.
One bed can run three rounds in a season. Cool crops, warm crops, cool crops again — each round feeding the next.
🌱 Round one — spring:
Peas on the trellis, lettuce in rows, spinach in the gaps, radishes in every open inch. These crops want cold soil and finish by late May. When the peas come out, the nitrogen-fixing nodules stay behind in the roots — free fertilizer for what comes next.
Pull everything in late May. Add an inch of compost. Replant the same day.
Round two — summer:
Bush beans go in the pea spot and feed on the nitrogen the peas left. Cucumbers grab the same trellis. Basil fills the lettuce gaps and thrives in the heat that killed the greens.
This round finishes by late August. Same routine — pull, compost, replant within the week.
🌿 Round three — fall:
Kale goes in September and tastes better after frost converts its starches to sugar. Turnips give you a fast root crop with edible greens — two harvests from one plant. Garlic goes in October, roots before winter, and you harvest it the following June.
The bed carried food from March through November and has garlic overwintering for next year.
Three rounds. Same soil. Each crop leaves something behind for the one that follows — nitrogen, trellis infrastructure, loosened soil, residual compost. The bed gets more productive each cycle, not less.
Same square footage. Roughly triple the harvest.

Maximise Your Harvest Yield

Maximise Your Harvest Yield

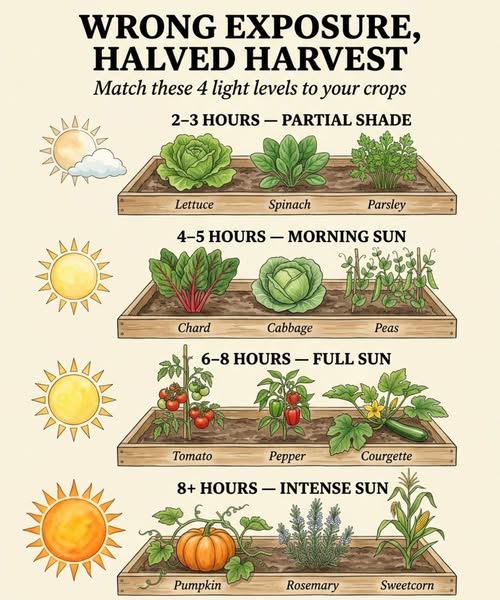
Wrong exposure, halved harvest. Most gardeners plant wherever there is space — not wherever there is the right light — and then blame the compost.

Every crop has a precise light requirement. Too much sun scorches delicate leaves. Too little and fruit never ripens.

2 to 3 hours of sun is enough for lettuce, spinach, lamb’s lettuce, and parsley. The shade actually protects them from bolting in warm weather.

4 to 5 hours suits chard, brassicas, peas, and leafy herbs. These grow well with morning sun and afternoon shade — the classic pole-facing or partially shaded bed is often better for these crops than a full equator-facing position.

6 to 8 hours unlocks tomatoes, peppers, and courgettes. Without full sun, British-grown tomatoes stay green and flavourless, and peppers remain thin-walled. An equator-facing raised bed or a warm sheltered wall is essential for these crops in most of the UK.

8+ hours of direct sun is the requirement for pumpkins and squash, Mediterranean herbs such as rosemary, thyme, and sage, and sweet corn. These are the plants that genuinely need the most open, unshaded, sun-facing position available. Rosemary especially thrives in a hot dry sun-facing spot and resents shade.

Map the sun hours on your bed before deciding what to plant in it.

Trellis Types

Trellis Types

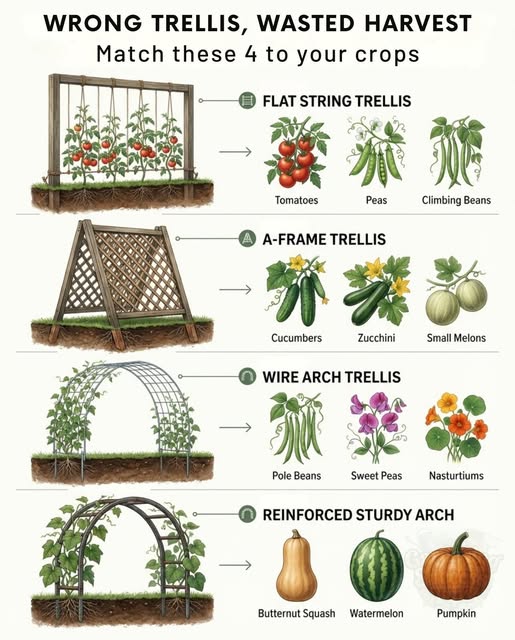
Each climbing vegetable needs a different support structure. The wrong match means broken stems, poor airflow, and fruit rotting on the ground.

Flat string trellises give tomatoes the vertical plane they need to spread heavy branches evenly.

A-frame designs let cucumbers hang freely underneath — the fruit grows straight and clean instead of curling on the soil.

Wire arches suit beans and peas perfectly. Their tendrils wrap thin wire far better than thick wood.

Heavy producers like squash or melons demand reinforced arches with fabric slings under each fruit. Without support, the weight tears the vine down mid-season.

The setup rule that saves your roots:
– Install your trellis before transplanting, not after — driving stakes near established roots damages the plant you’re trying to help
– Set the structure first, then plant about six inches from the base
– Anchor trellises on the north side of the bed so vertical crops don’t shade shorter plants to the south. (In the Northern Hemisphere. Reverse that in the Southern Hemisphere.)

One trellis per crop type. Get that right and vertical gardening stops being a gamble.

Tomato Growing Made Simple

Tomato Plant Tips

Tomatoes reward small, smart habits. A few simple steps can turn average plants into strong, productive ones.

1 Feed the soil first
Add compost or organic matter at the bottom of the planting hole. A little wood ash can also boost nutrients.
Relatable mistake – planting straight into poor soil and expecting miracles.

2 Trim before planting
Remove the lower leaves a couple of days before transplanting. This encourages deeper rooting and helps reduce disease risk.

3 Water wisely at the start
Avoid overwatering early on. Slightly drier conditions encourage roots to grow deeper and stronger.

4 Pinch the suckers
Remove side shoots when they’re about 5 cm long. This helps the plant focus its energy on fruit production instead of extra foliage.

Simple, consistent care leads to healthier plants and a more generous harvest. Small actions, big tomato rewards.

How To Prune Rosemary

How To Prune Rosemary

Rosemary hides its problems well — it still smells good even when half the base is dead. Annual pruning prevents the point of no return from arriving unannounced.

The rule that governs rosemary is the same as for lavender: below the green zone lies grey wood that does not regenerate. Without annual pruning, the shrub lignifies from the base upward, and within three years you have a bare trunk topped by a green tuft at the tips. At that point there is no recovery — old rosemary wood does not carry dormant buds capable of breaking back into growth.

How to manage it through the year in the Northern Hemisphere:
— Late February to early March: formative prune. Cut back the green stems by roughly a third, keeping carefully above the visible junction between the soft young growth and the rigid old wood beneath. That junction is the line that must not be crossed.

— April and May: leave the plant completely alone and enjoy the flowering. This is the main pollinator window — early bumblebees and honeybees depend on rosemary as one of the first substantial nectar sources of the year.

— June: a second light trim to remove spent flowerheads and encourage new lateral growth.

Two rules that never change:
— The dry grey bark at the base is a no-cut zone. Cutting into it leaves permanent stubs that will produce nothing.

— Remove stems that cross through the centre of the shrub. Without airflow, the interior stays damp and fungal problems develop.

After six to eight years, even the best-managed rosemary thins at the base. Replacing it with a rooted cutting taken in summer is a better option than trying to force recovery from an old plant.

The line between green and woody is the only secret to a compact rosemary for years.

For the Southern Hemisphere (e.g., Australia)

Seasons are reversed, so shift the timing by about 6 months to match the equivalent part of the seasonal cycle:

  • Main formative prune: Late August to early September (your late winter/early spring).
  • Leave alone for flowering: Roughly October–November (your spring flowering window for pollinators).
  • Light trim after flowering: December (your early summer).

Fruit Tree Helpers

Fruit Tree Helpers

Each plant at the base of your fruit trees has a specific role: feeding the soil, deterring pests, attracting pollinators, or covering bare ground. Together they form a self-sustaining ecosystem that works for the tree throughout the year and progressively reduces the maintenance it demands.

Comfrey — deep roots that draw up calcium, potassium, and phosphorus from subsoil layers. Cut the leaves five or six times per year and leave them as a free mineral mulch directly under the tree.

Chives — sulphur-rich foliage that deters aphids and limits fungal disease around the trunk. Self-maintaining once established.

White clover — a living mulch that fixes atmospheric nitrogen in the root zone and provides continuous nectar for pollinators from spring to autumn.

Yarrow (Achillea millefolium) — flat flower clusters that attract hoverflies and parasitic wasps, both significant predators of aphids and caterpillars.

Daffodils — toxic bulbs planted in a ring near the trunk to deter voles and other burrowing rodents that target fruit tree roots.

Calendula — root exudates that reduce harmful soil nematode populations, and a strong scent that disorients flying pests.

Sweet alyssum — a dense mat of tiny flowers that draws hoverflies, lacewings, and parasitic wasps in large numbers throughout the season.

Borage — one of the best bee plants in the British garden, improving fruit tree pollination significantly. Self-seeds reliably from year two onwards.

Nasturtium — the most effective aphid trap plant available. Aphids gather on nasturtiums in preference to almost everything else nearby, drawing them away from the tree.

The more this system matures, the less you need to intervene.