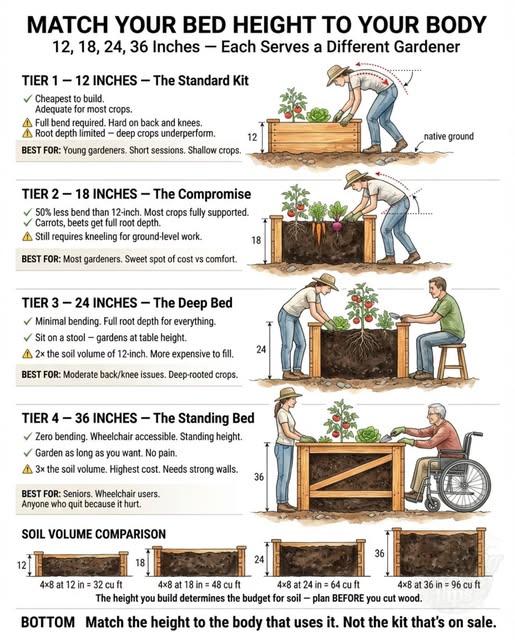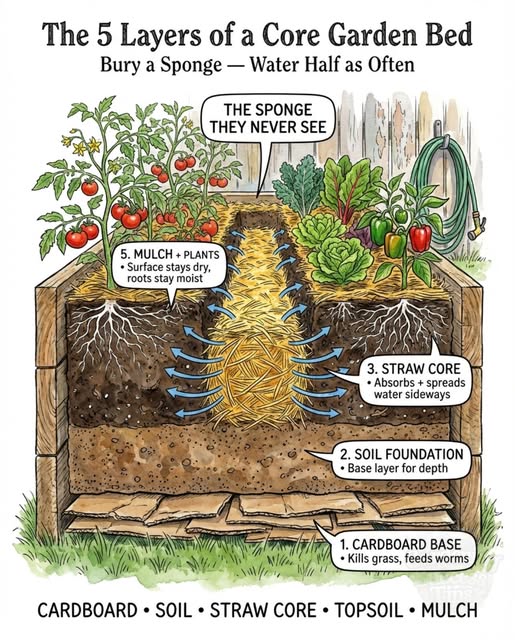
The most common raised bed mistake is filling the entire depth with expensive purchased topsoil or compost. A standard 30 cm (12-inch) deep raised bed filled entirely with quality growing medium costs significantly more than it needs to and provides no growing advantage over a bed filled with a cost-effective layered approach that uses the bottom half for bulk fill and reserves the upper half for the quality growing medium where plant roots actually spend most of their time.
Understanding what plant roots need, and where in the bed profile they actually develop, changes how you approach filling a raised bed and significantly reduces the cost of establishing one without any reduction in growing performance.
Here is the complete raised bed filling framework ??
What roots actually need and where they grow:
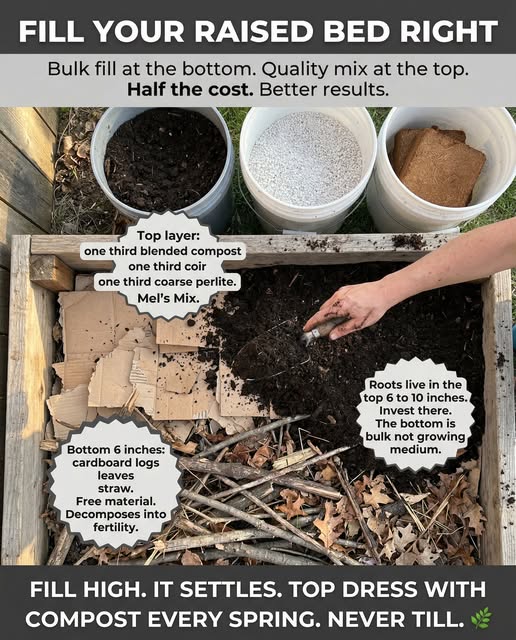
Most annual vegetable crops develop the majority of their active root system in the top 15-25 cm (6 to 10 inches) of growing medium. The fine feeder roots that absorb water and nutrients concentrate in the upper portion of the bed where organic matter, biological activity, and oxygen levels are highest. The deeper roots provide anchorage and access water reserves during dry periods but do not contribute significantly to nutrient uptake in the same way the upper feeder roots do.
This root distribution means the quality and composition of the upper half of the bed matters enormously. The lower portion of a deep bed matters much less and can be filled with significantly less expensive bulk material that contributes primarily as a moisture reservoir and as organic matter that decomposes upward over subsequent seasons.
The layered filling approach — the cost-effective method:
Bottom layer — the bulk fill, 15 cm (6 inches).
The bottom layer of a raised bed can be filled with any combination of organic materials that will decompose over time and contribute to the growing medium above. This is the hugelkultur principle applied in a simplified form.
Small logs and branches: woody material that decomposes slowly, holding moisture and releasing nutrients over years. Fill loosely to allow settling.
Cardboard: plain cardboard without glossy printing or staples. Breaks down within one season. Suppresses any grass or weeds below the bed. Contributes carbon to the developing soil biology.
Leaves: autumn leaves either fresh or partially composted. High carbon material that decomposes within one to two seasons. Free from any garden with deciduous trees.
Straw: clean straw, not hay which contains seeds, provides bulk fill that decomposes within one season contributing organic matter to the growing medium above.
Grass clippings: mixed with cardboard or leaves to prevent compacting into a dense mat. High nitrogen material that decomposes rapidly and contributes fertility.
The combination of cardboard at the very base, logs or branches above it, and leaves or straw filling the gaps produces the most biologically active bottom layer with the widest range of decomposition rates and the most significant long-term contribution to the growing medium above.
Middle layer — the transition zone, 5 cm (2 inches).
A transition layer of finished compost between the bulk fill and the quality growing medium above introduces the biological community that begins processing the bulk material below. It also provides an anchor layer for the growing medium above and prevents settling of the surface layer directly into the bulk material below.
Top layer — the quality growing medium, 15-20 cm (6 to 8 inches).
The top layer is where the investment is made. This is the growing medium that plant roots primarily occupy and where the growing performance of the bed is determined. Two approaches both produce excellent results.
Mel’s Mix — the original square foot gardening formula:
Mel Bartholomew developed this growing medium formula for his Square Foot Gardening system in the 1970s and it remains one of the most widely used and most reliable growing medium recipes available. The formula is simple and the results are consistently excellent.
One third blended compost. One third peat moss or coco coir. One third coarse perlite.
The blended compost component
Mel’s original formula specifies blended compost from multiple sources rather than a single compost type. The reasoning is that different compost sources have different nutrient profiles and microbial communities. A blend of three to five different composts, mushroom compost, worm castings, garden compost, manure-based compost, and leaf compost, provides a more complete and diverse foundation than any single compost source.
Most gardeners cannot source five different composts economically. A blend of two or three is an adequate practical compromise. At minimum combine a mushroom or manure-based compost with a leaf or green waste compost for meaningful diversity.
The peat moss or coco coir component
Peat moss provides the moisture retention and slightly acidic pH that suits most vegetable crops. It also improves the physical structure of the growing medium, preventing compaction and maintaining the loose open texture that plant roots and soil organisms require. The environmental concern around peat extraction from peat bogs makes coco coir the preferred alternative in most current applications. Coco coir provides similar moisture retention and physical structure benefits without the ecological cost of peat extraction.
Coco coir is available in compressed bricks that expand when hydrated. One compressed brick typically produces 2 to 3 gallons of expanded coir. Hydrate fully before incorporating into the mix.
The coarse perlite component
Perlite prevents the compaction that would otherwise occur in a growing medium dominated by compost and coir. Over time compost-heavy growing medium compacts under the weight of watering and plant root development. Perlite particles maintain the pore structure that allows air and water to move through the medium and that prevents the anaerobic conditions that damage root systems.
Use coarse perlite rather than fine perlite. Fine perlite particles wash to the surface with repeated watering and provide less durable pore structure than coarse particles.
The Volume Calculation
To avoid over or under purchasing, calculate the volume of your bed in liters or cubic feet. Length multiplied by width multiplied by depth. For a 120 cm (4 foot) by 240 cm (8 foot) bed filled to 30 cm (12 inches) depth: .86 of a cubic meter (860 liters) (4 x 8 x 1 feet equals 32 cubic feet) total. The bottom half bulk fill layer represents half that volume. The top half quality growing medium represents the remaining half.
For Mel’s Mix in the top layer, half the total volume is 430 liters (16 cubic feet) divided by 3 equals approximately 143 liters (5.3 cubic feet) of each component. Purchase 150 liters (6 x 25 liter bags) (6 cubic feet) of each to allow for settling.
Settling Allowance
All raised bed growing medium settles significantly in the first season as organic materials begin to decompose and compact slightly. Fill the bed 2-5 cm (1 to 2 inches) above the top of the frame to compensate for first-season settling. Add a 2 cm (1 inch) compost top dressing each spring to maintain the growing medium level and replace the organic matter lost to decomposition.
The Economics — What This Actually Costs
As of 10 April 2026 from Bunnings in Sydney,
Compost $6-10 25l
Peat Moss $50 25l
Coco Coir $27.50 90l
Perlite $15.56 25l
Vermiculite $50 25l
Cow manure $5 25l
Chook manure $5 25l
Sheep Manure $7 25l
Potting Mix $4-11 25l
2 blocks coco coir $55
6 bags compost $48
6 bags perlite $94
Total outlay $197
So filling our garden bed with a 6-inch bulk fill layer and 6-inch Mel’s Mix top layer costs less than $200 in materials depending on local compost prices and whether bulk fill materials are sourced free from the garden. The same bed filled entirely with purchased topsoil or bagged growing medium costs $400 or more.
The layered approach costs half as much, produces better long-term growing performance as the bulk fill decomposes and enriches the bed from below, and uses materials that would otherwise go to a green waste collection.
To create a cubic meter of soil from scratch
(assuming access to compost that contains no manure)
(Prices from Bunnings.com.au, Sydney 10 April 20226)
525 litres compost (21 x 25 litre bags) $328
250 litres perlite (10 x 25 litre bags) $156
1 block coco coir (1 x 90 litre block) $28
75 litres cow manure (3 x 25 litre bags) $16
25 litres chook manure (1 x 25 litre bags) $5
25 litres mushroom compost (1 x 25 litre bags) $6
10 litres seaweed (1 x 10 litre bags) $99
Total: $638
Making your own compost halves the cost of creating soil.
Topping up established beds — the annual maintenance:
Every season the growing medium level in a raised bed drops 1 to 2 inches as organic matter decomposes. Maintaining the growing medium level by adding a 2 cm (1 to 2 inch) compost top dressing each spring maintains the quality of the upper growing zone and replaces the biological activity lost as organic matter is processed.
Do not add more perlite or coir annually. These components do not decompose and accumulate in the growing medium over multiple seasons. Add compost only for annual top ups. If you top-dress annually, complete refreshment is needed only every 3 to 5 seasons when the growing medium has significantly degraded.
A complete refresh is roughly:
35 % old soil (minerals + microbial continuity)
35 % compost (fertility + biology)
20 % perlite (drainage & air — crucial for veggies in pots)
5–6 % peat moss or coco coir (moisture without sogginess)
4 % cow manure
1 % chook manure (gentle nutrient boost)
Fill it right once. Top dress annually. The bed improves every season.
Save this. Use this formula for your next raised bed installation or potting mix.