Rat-Proof Grain Store

Rat-Proof Grain Store Rat-Proof Grain Store 2

The Romans had no rat traps or poisons so they had to protect their grain stores from rats through other methods or risk starving. They built elevated grain stores with no rat accessible entry points.

Building floor a metre off the ground
Smooth stone pillar supports
With overhang impossible to climb around
No low level entry points
Ventilation via small openings at top of wall
Human access via removable ramps

to view the video: https://www.facebook.com/share/r/1CnTxu1Buf/

Build A Raised Garden Bed With Cinder Blocks

Build A Raised Garden Bed With Cinder Blocks

Stack twenty-eight cinder blocks in a rectangle on the ground. No drill. No saw. No screws. No lumber that rots in ten years. Fill with soil and plant.

The blocks sit flat with the holes facing up. Two courses tall, offset like brickwork so they interlock. A filled bed weighs over a ton — it’s not going anywhere. The walls are eight inches thick. They don’t bow, tip, or fail.

Lay cardboard underneath first to smother the grass. Fill the bottom six inches with rough compost or leaves, the top ten inches with quality soil mix. Water deeply, let it settle overnight, plant the next day.

Here’s what makes this better than wood.

The herb pockets:

– Each block has two open holes on top. Fill each one with potting soil and plant one herb per hole

– Fourteen blocks on the top course means twenty-eight herb pockets running along the entire perimeter of the bed

– Basil, thyme, oregano, chives, parsley, cilantro — a different herb in each hole. They cascade over the block edges by midsummer

– The main bed grows your vegetables. The block holes grow your herb garden. Two gardens from one structure.

No tools. No skills. No rot. A bed that outlasts the lumber version by decades and grows herbs on its own walls.


Low-Fuss, High-Return Edibles

Low-Fuss, High-Return Edibles

The vegetable garden everyone admires often belongs to the person who does the least.

Not because they’re lazy — because they planted things that don’t need replanting, don’t need spraying, and produce year after year from the same roots.

Most food gardens run on annuals. You start over each spring, buy new transplants, prep the soil again, and hope the season cooperates. Perennial food plants skip that cycle entirely. They establish once and keep producing — some for decades — with almost no input beyond occasional harvest.

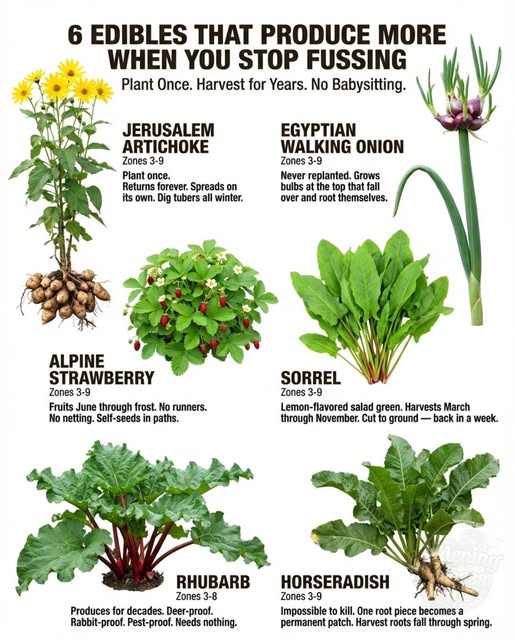
6 perennial food plants that keep going without you:

– Jerusalem artichoke — plant the tubers once and the stand comes back taller each year. The tubers taste like a nuttier, sweeter potato, store in the ground all winter, and you dig them as needed. The only management is deciding where you want the patch to stop spreading.

– Egyptian walking onion — grows bulbils at the top of each stalk that bend the stem to the ground and root themselves. The plant moves about a foot per year, producing mild green onion tops for cutting and perennial bulbs underground.

– Alpine strawberry — fruits from June through frost without runners or netting. Small, intensely flavored berries produced continuously rather than in one heavy flush. Self-seeds gently in paths and borders and handles part shade well.

– Sorrel — a salad green with a bright lemon flavor that survives winter and produces harvestable leaves from early spring through late fall. Cut it to the ground and it returns within a week.

The food garden that lasts isn’t the one you tend the most. It’s the one planted with species that don’t need you to start over each year.

The harvest that keeps coming is the one you stopped worrying about.

The Weed Squad

The Weed Squad

You already know weeds signal soil problems. What most people miss is that many of them are actively fixing the problem while you pull them out.
Dandelions don’t just indicate compaction. Their taproots drill through hardpan that most garden tools can’t reach. As each root decays, it leaves a vertical channel that carries water, air, and earthworms into soil layers that haven’t been loosened in years.
Pulling the dandelion removes the drill. The compaction stays.
White clover does something different — it pulls nitrogen from the atmosphere and converts it into a form plant roots can use. The conversion happens through bacterial colonies living in tiny nodules on the roots. Mow it or let it shed naturally and the nitrogen transfers into the surrounding soil. The fertilizer was already in the lawn. It just looked like a weed.
🌱 Three ways to let weeds work for you instead of against you:
– Leave dandelions in compacted areas through one full season — when the taproots die back naturally, the channels they leave behind improve drainage and root penetration for whatever you plant next
– Stop spraying white clover in the lawn — it feeds the grass around it for free and stays green in dry stretches when turf goes dormant
– Chop comfrey leaves and drop them as mulch around tomatoes or peppers — comfrey roots pull minerals from deep soil layers that shallow vegetable roots can’t access, and the leaves concentrate them at the surface where your crops can use them
The garden sends repair crews before you call for them. The weeds that showed up uninvited are doing work you’d otherwise need to buy amendments to replace.
The weed you keep pulling is the amendment you keep buying

Pest Traps – Sacrificial Plants

Pest Traps - Sacrificial Plants

The smartest pest control in a garden isn’t a spray. It’s a plant so irresistible to the pest that it abandons your vegetables to feed on something you planted specifically to be destroyed.

You sacrifice one cheap, fast-growing plant to save an entire row of expensive crops. The pest gets what it wants. Your harvest stays clean.

Nasturtiums are the easiest place to start. Aphids, cabbage moths, and flea beetles tend to prefer nasturtium foliage over most vegetable crops — the leaves are soft, thin, and easier to feed on than the tougher tissue of your brassicas. Plant a ring around the vegetable bed. When the nasturtiums are covered in aphids, your cabbages are clean. That’s the system working.

Trap plants worth adding to a vegetable garden:

– Nasturtiums around bed edges — draw aphids and leaf-chewing insects away from brassicas and cucumbers. Cheap, fast-growing, and the flowers are edible if the pests don’t get them first

– Blue Hubbard squash at the end of a squash row — vine borers and squash bugs strongly prefer it over most other squash varieties. One sacrificial plant absorbs the pressure so the rest of the row stays productive

– Sunflowers near tomatoes — aphids climb to the growing tip and cluster there, visible and exposed. Ladybugs and lacewings find them quickly. The sunflower becomes an elevated feeding station for beneficial insects while your crops below stay clear

– Alyssum between rows — attracts hoverflies whose larvae consume large numbers of aphids. The trap and the predator recruitment happen on the same plant

The plant you sacrifice saves the harvest you keep.

How Much Mulch?

How Much Mulch?

Most garden beds need three inches of mulch. Not one. Not four. Three.

One inch blocks some annual weeds but dries out fast. Two inches saves water but still lets persistent weeds through. Four inches insulates roots in winter — but traps moisture against stems and causes rot in actively growing beds.

Three inches is where everything works at once. Weeds stop germinating through it. The soil underneath stays dark and moist between waterings. And the bottom layer is constantly decomposing — feeding organic matter into the soil while the top layer is still suppressing weeds.

The mulch is building your soil and protecting it at the same time.

The one rule at any depth:
– Pull mulch back an inch or two from every stem. Mulch touching bark holds moisture against it around the clock — that’s how collar rot starts. The bare circle around each stem isn’t laziness, it’s the whole point

Best mulch by use: straw for vegetable beds (light, cheap, breaks down in one season), wood chips for perennials and paths (lasts longer), shredded leaves for free soil feeding (decomposes fastest).

Three inches. Pulled back from stems. That’s the entire system

Remedies For Plant Diseases

Remedies For Plant Diseases

The garden center sells a bottle for every plant disease. Your grocery store sells the same active ingredients for a fraction of the price.
Milk kills powdery mildew. Baking soda kills black spot. Cinnamon kills damping off. The science behind all three is real, and you probably already own them.
🌱 Six diseases, six grocery-store fixes:
– White powdery coating on squash, cucumber, or rose leaves — mix forty percent whole milk with sixty percent water, spray weekly in morning sun. The milk proteins create a reaction on the leaf surface that kills the spores.
– Black spots with yellow halos on roses — one tablespoon of baking soda in a gallon of water with a drop of dish soap. Spray weekly. It raises the leaf surface pH above the range where the fungus can germinate.
– Seedlings collapsing at the soil line — sprinkle ground cinnamon directly on the soil surface. It kills fungal spores on contact. Also works on cut surfaces when dividing plants or taking cuttings.
– Aphid clusters on leaf undersides — one tablespoon of cold-pressed neem oil in a gallon of water with a drop of dish soap. Spray directly on the clusters in the evening. Target only where you see them — neem kills beneficial insects too.
– Weak pale seedlings that won’t thrive — water trays with cooled chamomile tea instead of plain water. The gentlest treatment on the list.
– Dark water-soaked spots spreading fast on tomatoes in wet weather — copper spray from the garden center, applied before infection as a preventive. The only one on this list with real risks from overuse — follow label rates exactly.
The grocery store treatment aisle costs less than the garden center one. And it works.

20 Veggies To Grow In Shade

20 Veggies To Grow In Shade
There are some inclusions here with which other data I have does not agree. Broccoli, Brussels sprouts, Cabbage and Kale are commonly held to require more sun to produce larger yields. Probably the difference between what you can get away with to produce a result versus what is optimal.

Greenhouse Chicken Coop

Greenhouse Chicken Coop

When a coop shares a wall with a greenhouse, four exchanges happen without any equipment. The chickens exhale CO2 that the plants use for photosynthesis. The plants release oxygen that circulates back to the coop. The chickens radiate enough body heat to smooth temperature swings on cold nights. And the manure composts into the fertilizer the greenhouse beds need.

No electricity. No pumps. Just a shared wall with adjustable vents.

The heat contribution is modest — it won’t replace insulation in a harsh winter, but it smooths the overnight temperature swing that kills tender seedlings. The CO2 is modest too — not commercial greenhouse levels, but enough to replenish what the plants consume in a sealed winter greenhouse.

What makes it work:

– Adjustable vents in the shared wall — open during the day for gas exchange, closed at night to trap warmth

– Wire mesh barriers so chickens can’t access growing beds. They’ll scratch up seedlings and dust-bathe in your soil if given the chance

– Deep litter on the coop floor — eight to twelve inches of straw or wood shavings that absorbs moisture, reduces ammonia, and composts in place

– Enough ventilation to prevent ammonia buildup. Chicken manure in an enclosed space harms both plants and birds without airflow
Four exchanges running continuously. The animals feed the plants. The plants clean the air for the animals.

The smartest design is letting biology work together

Growing Containers

Growing  Containers

The same tomato plant in four different containers produces completely different yields. The container is not a secondary detail.
The fabric grow bag performs best for a specific reason: when roots reach the permeable wall, the air at the surface desiccates the root tip and the plant responds by producing dense lateral branching further back — a process called air pruning. In a solid plastic pot the root circles continuously until it becomes pot-bound, compressing its own vascular system. In a fabric bag the root system fans outward in branched layers, maximising the volume of compost it can access.
Fabric bags also run significantly cooler than dark plastic containers. A black plastic pot in full summer sun can reach soil temperatures that slow root activity and reduce fruit set. A fabric bag in the same position will typically stay 6 to 10°C cooler.
What happens in each container:
Dark plastic pot — traps heat. Root temperatures above 28°C in summer conditions are possible. Roots circle and become constrained. Inexpensive to buy, costly in yield.
Fabric grow bag — roots branch rather than circle. Better oxygen at the root zone, better water distribution, better production. The best choice for tomatoes on a balcony or terrace.
Terracotta pot — transpires moisture through the walls, which cools the root zone naturally and prevents waterlogging. Excellent for herbs and drought-tolerant crops. For tomatoes it increases watering frequency, and in hot dry summers it can stress the plant. Works well with consistent attention.
20-litre bucket — conducts temperature change rapidly. Roots experience cold nights and warm days as sharp fluctuations rather than buffered changes. Works for tomatoes if the bucket is partially buried or insulated.