
Tom's Blog on Life and Livingness


Stinging nettle — the weed that fights back when you grab it — tastes like spinach’s more assertive cousin once you blanch it for thirty seconds. The brief boil neutralizes the sting completely. It’s dense in calcium, iron, and protein. It shows up along fence lines and damp field edges in spring, when the young tops are most tender.
Wild violet — the small purple flower carpeting shady lawns in spring — has leaves mild enough for raw salads and flowers that make an edible garnish with a faintly sweet flavor. The heart-shaped leaves are rich in vitamin C.
Broadleaf plantain — the flat, oval-leaved weed that survives being stepped on, parked on, and mowed over — is rich in vitamins A, C, and K. Young leaves taste mild enough for salads. Older ones cook down like a sturdier spinach.
Garlic mustard — the woodland-edge invader with heart-shaped leaves and a sharp garlic-onion scent — was brought to the U.S. as a cooking herb and is now so aggressive that land managers encourage people to pull it. Straight into a colander.
– Harvest nettle with thick gloves and blanch immediately — 30 seconds in boiling water disarms the sting
– Pick violet leaves in early spring when they’re youngest
– Pull plantain leaves small, before the veins toughen — use raw like a mild, slightly fibrous green
– Gather garlic mustard before it flowers for the best flavor — first-year rosettes and second-year leaves both work
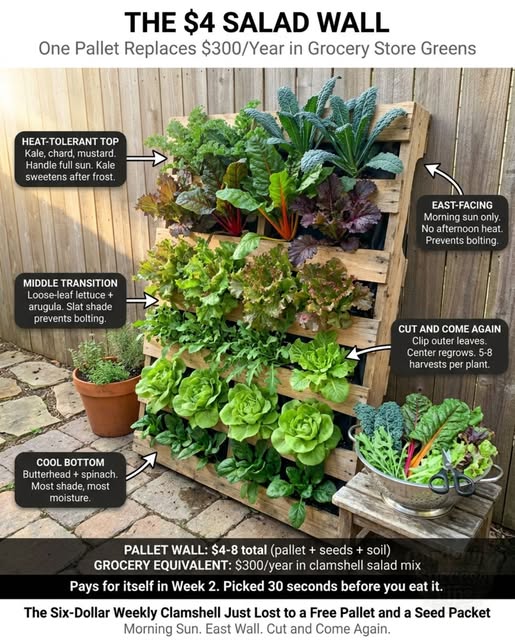
The grocery store version costs more and delivers less.

This water-rooting method produces 10× more stalks in half the time!
Traditional celery growing takes 130-140 days from seed and fails 70% of the time for beginners. But this hydroponic water-rooting method produces harvest-ready celery in just 60-75 days using recycled bottles and water! #DIYGarden
The secret is letting celery roots develop in nutrient water BEFORE transplanting to growing system. Roots develop 3-4× faster in water than soil, creating explosive growth from day one. Zero seed starting, zero thinning, zero transplant shock!
Here’s the complete 4-stage system from bottle propagation to full harvest, using materials you already have at home.
Stage 1: Set Up Bottle Propagators
Transform recycled glass jars or plastic bottles into self-contained growing units. Each bottle becomes an individual hydroponic propagator!
Materials needed:
Glass jars OR large plastic bottles (1-litre minimum)
Expanded clay pebbles (hydroton) OR small gravel ($8-12 per bag)
Water (tap or filtered)
Celery base scraps OR celery transplants
White caps/plugs for side holes (prevents algae)
Bottle preparation:
Option 1 – Glass jar method (shown in image):
Use wide-mouth mason jars or recycled glass bottles
Fill bottom 1/3 with water (nutrient solution)
Add expanded clay pebbles to top 2/3 (holds plant, allows root access to water)
Place white cap plug on side (shown in image – allows water refilling without disturbing plant!)
Option 2 – Plastic bottle method:
Cut bottle in half
Invert top half into bottom half (creates reservoir)
Fill inverted top with clay pebbles
Bottom half holds water reservoir
Why clay pebbles: Excellent drainage + air circulation around roots. Roots need oxygen as much as water. Clay pebbles provide perfect balance!
Water level critical: Keep water at bottom 1/3 of jar only. Roots need air above water line. Submerging entire root zone = root rot!
Stage 2: Root Celery In Bottles (Days 1-21)
Place celery base OR transplant into clay pebbles. Roots develop rapidly in water, visible through clear glass!
Starting material options:
Option A – From celery base (FREE):
Save bottom 2-3 inches of store-bought celery
Place cut-side down in clay pebbles
Roots emerge from base within 5-7 days
New stalks emerge from centre within 10-14 days
Option B – From nursery transplant (faster):
Purchase 4-6 week old celery transplant
Gently wash all soil from roots
Place roots through clay pebbles into water zone
Established roots adapt to water growing within 3-5 days
Water nutrient solution:
Plain water works for first 2 weeks. After that, add hydroponic nutrients:
Hydroponic nutrient solution (General Hydroponics Flora Series): 5ml per gallon
OR: 1 teaspoon fish emulsion per gallon (organic option)
Change water completely every 7-10 days (prevents bacterial growth)
Root development timeline:
Days 1-7: Initial root tips visible through glass
Days 7-14: Root mass expanding (exciting to watch!)
Days 14-21: Dense white root network visible
Day 21+: Ready for transfer to growing system!
Light requirements: Bright indirect light (windowsill works!). Direct sun causes algae in water (cover jar sides with dark tape if algae appears).
Temperature: 65-75°F ideal. Roots develop faster in warmer conditions.
Stage 3: Transfer To Hydroponic Growing System (Days 21-30)
Once root mass is established, transfer plants to larger hydroponic growing tray for maximum production!
DIY growing tray system:
Materials:
Large rectangular storage container (12×24 inches minimum)
Net cups/pots (2-3 inch diameter, white plastic)
Drill with hole saw bit (matches net cup diameter)
Air pump + air stone (aquarium pump, $12-15)
Hydroponic nutrient solution
Assembly:
Step 1: Drill holes in container lid, evenly spaced (4-6 inches apart). Each hole holds one net cup.
Step 2: Fill container with nutrient water solution (4-6 inches deep).
Step 3: Insert air stone at bottom of container, connect to air pump. Oxygenated water = 3× faster growth!
Step 4: Transfer rooted celery from bottles into net cups. Fill cups with clay pebbles around roots.
Step 5: Place net cups in holes. Roots should dangle into nutrient water while clay pebbles stay above waterline.
Spacing: 4-6 inches between net cups. Celery grows 18-24 inches tall, needs light access.
Why this system works: Roots get constant water + nutrients + oxygen. No soil compaction, no drought stress, no nutrient depletion. Perfect growing conditions 24/7!
Stage 4: Grow & Harvest Continuously (Days 30-75+)
Celery in hydroponic system grows 2-3× faster than soil! Harvest outer stalks while plant keeps producing from centre.
Growth timeline after transfer:
Week 1-2: Roots establish in new system
Week 3-4: Visible stalk production begins
Week 5-6: Stalks reach 8-12 inches (baby celery stage)
Week 8-10: Full-size stalks 18-24 inches tall
Week 10+: Continuous harvest!
Harvesting technique:
Cut outer stalks: Use scissors to cut outermost stalks at base. Leave centre growing point intact. Plant produces new stalks from centre continuously!
Never harvest more than 30%: Taking too many stalks at once stresses plant. Harvest 2-4 outer stalks per week = sustainable continuous production.
Harvest frequency: Every 5-7 days once production established. One system of 8 plants = fresh celery WEEKLY!
Nutrient maintenance:
Weekly: Check water level, top up with plain water (plants drink water, leaving nutrients behind)
Every 2 weeks: Complete water change with fresh nutrient solution
Monthly: Check pH (ideal 5.5-6.5 for celery). Use pH test kit ($8) and adjust with pH up/down solutions.
Signs of healthy growth:
Bright green stalks (dark green = nitrogen sufficient)
White healthy roots visible (brown roots = root rot, change water immediately)
New stalks emerging from centre weekly
Crisp firm texture when harvested
Traditional celery growing is frustrating and slow. This water-rooting system eliminates every common failure point and delivers continuous harvests from recycled bottles on your kitchen counter!

You think protecting commercial orchards requires pumping millions of gallons of synthetic neurotoxins. But heritage agriculturalists engineered a flawless insect defense grid without a single chemical drop.
Meet the forgotten art of Han Dynasty weaver ant biocontrol. Growers strategically transplanted wild nests of highly aggressive weaver ants. They linked entire citrus orchards together using woven bamboo canopy bridges. This artificially routed the territorial insects directly through vulnerable fruit zones.
The ants relentlessly hunted down and destroyed devastating caterpillars and bugs.
Modern entomological research confirms this self-replicating defense outperforms commercial pesticides.
Chemical sprays poison the soil while the living canopy protects itself.
(Australia has weaver ants, and the species found there is mainly the green tree ant, Oecophylla smaragdina, which occurs in tropical northern Australia, including parts of Western Australia, the Northern Territory, and Queensland.
They are called weaver ants because they stitch leaves together to make nests in trees.)
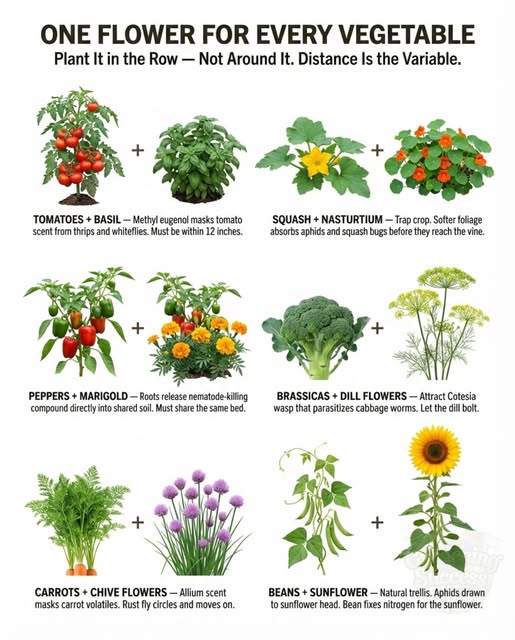
Stop planting flowers around your garden and start planting them inside it.
Most companion planting advice puts the helpful flower in a border or a separate bed. The problem is distance. The scent cloud, the trap effect, and the predator recruitment all weaken sharply past a foot or two. A flower planted twenty feet away from the vegetable it’s supposed to protect isn’t doing much.
The flower belongs in the row. Right next to the stem it’s defending.
Basil between tomato stems is the clearest example. The aromatic oils that confuse pests looking for tomato foliage work as a scent screen — but only at close range. Basil in a border across the garden is too far. Basil planted within a foot of the tomato stem masks the signal where it matters.
The same principle applies to every pairing that works.
Pairings that work when planted close:
– Nasturtiums at the base of each squash hill — soft foliage that pests prefer over squash leaves. When the nasturtium is loaded with aphids, the vine beside it is clean. Replace heavily infested plants mid-season to reset the trap
– Flowering dill or cilantro in the brassica row — the blooms attract tiny beneficial insects that target cabbage caterpillars. Let one or two plants bolt on purpose. The bolted herb is doing its most important work
– Flowering chives in the carrot row — the scent masks carrot foliage from flies that locate carrots by smell. The chives need to be in the same row, not in a pot nearby
– Sunflowers at the end of a bean row — aphids climb the sunflower stem and cluster at the top, drawing them away from bean foliage below. The bean fixes nitrogen that feeds the sunflower. Both benefit
The distance between the flower and the vegetable is the variable that changes whether companion planting works or doesn’t.
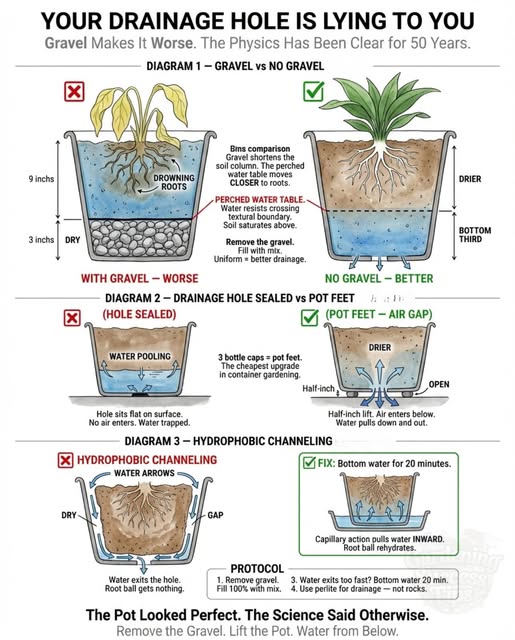
The pot has a drainage hole. You added gravel at the bottom for extra drainage. Water runs out when you pour it in.
The plant is still struggling. And the gravel is part of the reason.
A layer of coarse gravel under fine potting mix doesn’t help water move through faster. Water resists crossing from one texture into a very different one — it pauses at the boundary and the soil above holds more moisture than it would without the gravel there at all.
Fill the same pot entirely with potting mix, no gravel, and water actually moves through more evenly and exits the drainage hole sooner. The root zone ends up drier without the layer that was supposed to make it drier.
The fix is simpler than the problem.
Three things that actually improve container drainage:
– Skip the gravel — fill the pot with potting mix all the way to the bottom. A uniform column of the same material drains more consistently than layered materials with different textures.
– Lift the pot — a drainage hole sitting flat on a solid surface can seal under the weight of wet soil. Pot feet, small stones, or any spacer that lifts the base half an inch lets air enter from below, which is what pulls water downward and out.
– Bottom water when soil resists wetting — dry peat-based mixes sometimes repel water, sending it down the inside wall of the pot and out the drain while the root ball stays dry. Setting the pot in a tray of water for twenty minutes lets moisture pull upward through the soil evenly, rewetting the whole root zone from below.
The pot that looks like it’s draining well and the pot that’s actually draining well aren’t always the same pot.