In September 2011, an eighty-three-year-old children’s book author gave a radio interview that made strangers pull their cars over on American highways and weep.
His name was Maurice Sendak.
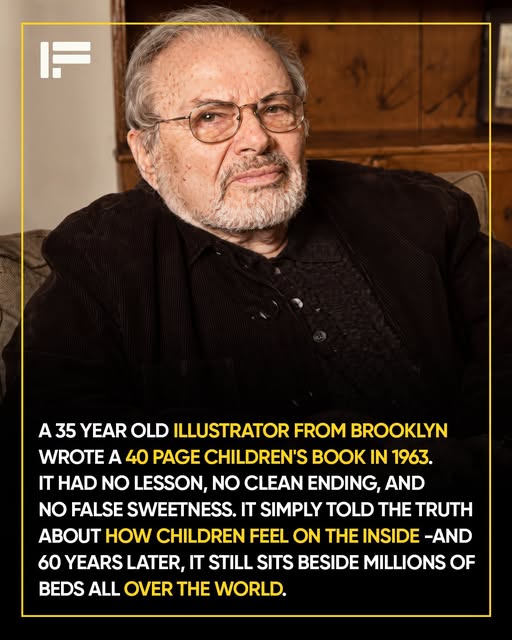
He was the man who, forty-eight years earlier, had written a small forty-page picture book about a boy named Max who got angry, got sent to his room without supper, and sailed off in his imagination to a place where wild things roared and gnashed their teeth.
The book was called Where the Wild Things Are.
It sold twenty million copies. It won the 1964 Caldecott Medal. It has never gone out of print in sixty-two consecutive years. It is, on the operating record of essentially every American library catalog of the following six decades, one of the most-read children’s books in the American commercial-publishing apparatus of the twentieth century.
Sendak had grown up in a Brooklyn tenement apartment in the 1930s, the youngest child of Polish-Jewish immigrant parents who had lost essentially every extended family member left behind in Europe during the Holocaust. He had been a sickly child. He had spent long stretches of his childhood in bed reading. He had watched his parents receive letters through the 1940s telling them that specific aunts and uncles and cousins had been murdered at specific extermination camps.
He knew from the beginning that childhood contained darkness.
He wrote children’s books that told children the truth about it.
Most children’s books in 1963 were cheerful and simple. They gave children bright colors, happy endings, and a world that always made sense.
Sendak did something different.
He gave them Max. He gave them a boy who got angry, was sent to his room without supper, and sailed away to a place where wild things roared and gnashed their teeth and rolled their terrible eyes. Max did not get punished for his feelings. He became king of them. And when the wildness was done, he came home. Because home was where someone loved him best of all.
Children understood immediately. Adults were not so sure. Some librarians pulled the book from shelves. Some parents worried it was too dark. Bruno Bettelheim publicly criticized it in a Ladies’ Home Journal column, arguing that a boy being sent to his room without supper would traumatize child readers.
But children, who always recognize the truth even when adults have forgotten how, loved it completely.
By 2011, Maurice Sendak was eighty-three years old.
His parents were long gone. His brother Jack was gone. His sister Natalie was gone. His partner of fifty years, the psychiatrist Eugene Glynn, had died of lung cancer four years earlier at their Ridgefield, Connecticut home. Sendak had never publicly acknowledged the relationship during Eugene’s lifetime — he told a New York Times profile in 2008, a year after Eugene’s death, that his mother would not have understood, and that he had not wanted to explain.
He had written his final children’s book, Bumble-Ardy, sitting at Eugene’s bedside during the final months of Eugene’s illness.
“I did it to save myself,” Sendak said later. “I did not want to die with him.”
He survived Eugene by five years.
He kept working. He kept drawing. He kept writing. He continued to give a small number of long interviews to the American press each year — Colbert, The New Yorker, Fresh Air.
That September, he sat down with Terry Gross of NPR’s Fresh Air for what neither of them knew would be his last interview.
He had spoken with Gross many times across the previous thirty years. He trusted her. He respected her.
At eighty-three, with nothing left to protect and nothing left to prove, he simply told her the truth.
He talked about the enormous old maple trees outside his studio window in Ridgefield — trees that had stood on the property for two or three hundred years before he was born and would stand there long after he was gone. He said he had fallen deeply in love with the world in his last years. Not in spite of everything he had lost, but because of it.
Then he said something that made people pull over on highways.
“I have nothing now but praise for my life. I’m not unhappy. I cry a lot because I miss people. They die and I can’t stop them. They leave me and I love them more.”
He cried on the phone.
Terry Gross cried on the phone.
Across the United States, strangers driving to work in the morning heard the interview on their local NPR affiliates. They pulled over on highway shoulders. They sat in parking lots. They wept. Not out of sadness exactly, but out of recognition. Because they had all been there. Holding love in their chest for someone no longer there to receive it. With nowhere to put it.
Before the interview ended, Sendak thanked Terry for the rare gift she had — the quality of presence that made people want to say the things they usually kept locked away.
Then, gently and plainly, he said:
“Almost certainly, I’ll go before you go, so I won’t have to miss you.”
And before the line went quiet, he left three words for everyone listening.
Not three different things. The same thing, said three times, because once simply was not enough.
“Live your life. Live your life. Live your life.”
The interview aired on September 20, 2011.
Eight months later, on the morning of Tuesday, May 8, 2012, Maurice Sendak died of complications following a stroke at Danbury Hospital in Danbury, Connecticut. He was eighty-three years old.
His books still live in libraries and on nightstands everywhere. Children still follow Max into the wild rumpus. Parents still sit on the edge of beds and read the words aloud, and sometimes, without quite knowing why, feel their voices catch.
Now they know why.
He cried nearly every day near the end. Not because life had taken from him. But because life had given him so much — so many people to love, so many mornings to love them in — that even at the very end the love was still spilling over.
That was the whole secret.
He cried because he loved them.
If his story stayed with you, drop one word in the comments — Maurice, Max, wild, anything that comes to mind. Tap the like button so more people find this story. The page is small. Every reaction helps us keep telling stories like this one.